


USER’S GUIDE 2512
1
Getting Acquainted
Congratulations upon your selection of this CASIO watch. To get the most out of your
purchase, be sure to carefully read this manual and keep it on hand for later reference
when necessary.
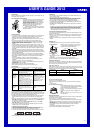
Expose the watch to bright light to charge its battery before using it.
You can use this watch even as its battery is being charged by exposure to bright
light.
• Be sure to read “Battery” for important information you need to know when
exposing the watch to bright light.
If the display of the watch is blank...
If the sleep indicator ( ) is on the display, the display is
blank because the watch’s Power Saving function has
shut it to conserve power. Power Saving automatically
turns off the display and puts the watch into a sleep state
whenever your watch is left in an area where it is dark for
a certain period.
• The initial factory default setting is Power Saving on.
• The watch recovers from the sleep state if you move it
to a well-lit area* or if you press any button.
*
It can take up to five seconds for the display to turn on.
• See “Power Saving Function” for more information.
Sleep indicator
About This Manual
• Button operations are indicated using the letters shown
in the illustration.
• Each section of this manual provides you with the
information you need to perform operations in each
mode. Further details and technical information can be
found in the “Reference” section.
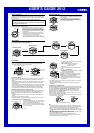
General Guide
• Press C to change from mode to mode.
• In any mode, press L to illuminate the display.
Data Memory
Mode
Stopwatch Mode
Timekeeping Mode
Alarm Mode
▲
▲
▲
▲
Press C.
▲
World Time Mode
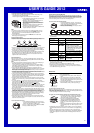
Timekeeping
Use the Timekeeping Mode to set and view the current time and date.
• Pressing A displays the Last Signal screen (date and time the time calibration
signal was last received) in the Timekeeping Mode.
Last Signal Screen
▲
Press A.
Seconds
Hour : Minutes
Receive date
Receive time
Month – Day Day of week
PM
indicator
▲
Current Time Setting
This watch automatically adjusts its time setting in accordance with a time calibration
signal. You can also perform a manual procedure to set the time and date, when
necessary.
• Before using the watch in Western Europe, first use the procedure under “Setting Up
the Watch for Use in Western Europe” to set the time in accordance with a time
calibration signal.
• Note that after you set your Home City (the city where you normally use the watch)
code, you must also turn on the watch’s time calibration signal receiver if you want
to enable auto time calibration. See “About Auto Receive” for more information.
• See “Setting the Time and Date Manually” for information about manual settings.
Setting Up the Watch for Use in Western Europe
You need to make the following three settings before using this watch in Western
Europe. The following provides a general overview of the setting procedure. For full
details, see “Setting the Time and Date Manually” and “Time Calibration Signal
Reception”.
• Specify the city code for your Home City (the city where you will normally use the
watch).
• Select the auto summer time (DST) setting.
• Perform the manual time calibration signal receive operation to set the current time.
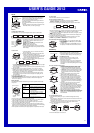
To set up the watch for use in Western Europe
1. In the Timekeeping Mode, press B. This causes the
current auto receive on/off setting (the receive indicator)
to flash, which indicates the setting screen.
2. Press C to move the flashing to the city code setting.
3. Use D(+) and A(–) to select the city code you want to
use as your Home City.
City code
Receive indicator
GMT differential
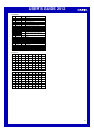
• The following are the city codes for major cities in the
Western Europe time zones.
BER and PAR: Berlin, Paris, Milan, Rome,
Amsterdam, Hamburg,
Frankfurt, Vienna
LON: London
4. Press C to display the summer time (DST) setting
screen.
5. Use D to select AUTO DST.
• AUTO DST specifies auto switching between Daylight
Saving Time and Standard Time.
6. Press B to exit the setting screen.
7. Hold down A for about two seconds until the watch
beeps.
• Release A and the message receiving appears to
indicate that signal reception has started.
• Time calibration signal reception takes from two to six
minutes. Take care that you do not move the watch
during this time.
Receive indicator
• If the watch is indoors, we recommend that you place the watch near a window to
allow better signal reception.
• After signal reception is complete, the display of the watch changes to the Last
Signal screen.
Time Calibration Signal Reception
This watch is designed to pick up a time calibration signal and update its time setting
in accordance with the signal. There are two different methods you can use to receive
the signal: Auto Receive and Manual Receive. With Auto Receive, the watch
automatically receives the calibration signal three times each day and makes
appropriate adjustments. With Manual Receive, you perform a specific button
operation to receive the calibration signal.
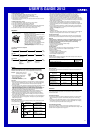
Before performing a signal receive operation, remove the watch from you wrist and
position it as shown in the illustrations below.
• If your watch has a resin band, pass the end of the band through the band loop and
place the watch on a stable surface.
Resin band Metal band
Pass through band loop.
Note
• If you are using the time calibration signal to set the time for this watch, be sure to
correctly set your Home City. Otherwise, there is the chance that the watch will not
set the correct time. See “Setting the Time and Date Manually” for details.
• Note that signal reception is possible only when the watch is within range of a time
calibration signal transmitter, and BER, PAR, LON, or ATH is selected as the Home
City code.
• See “City Code Table” for a complete list of available city codes.
• The current time setting in accordance with the time calibration signal takes priority
over any time settings you make.
• Auto receive is turned on when the watch is shipped from the factory.
• See the information under “Time Calibration Signal Reception” if you experience
problems with time calibration signal reception.