


USER’S GUIDE 2524
1
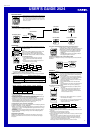
About This Manual
• Button operations are indicated using the letters shown in
the illustration.
• Each section of this manual provides you with the informa-
tion you need to perform operations in each mode. Further
details and technical information can be found in the
“Reference” section.
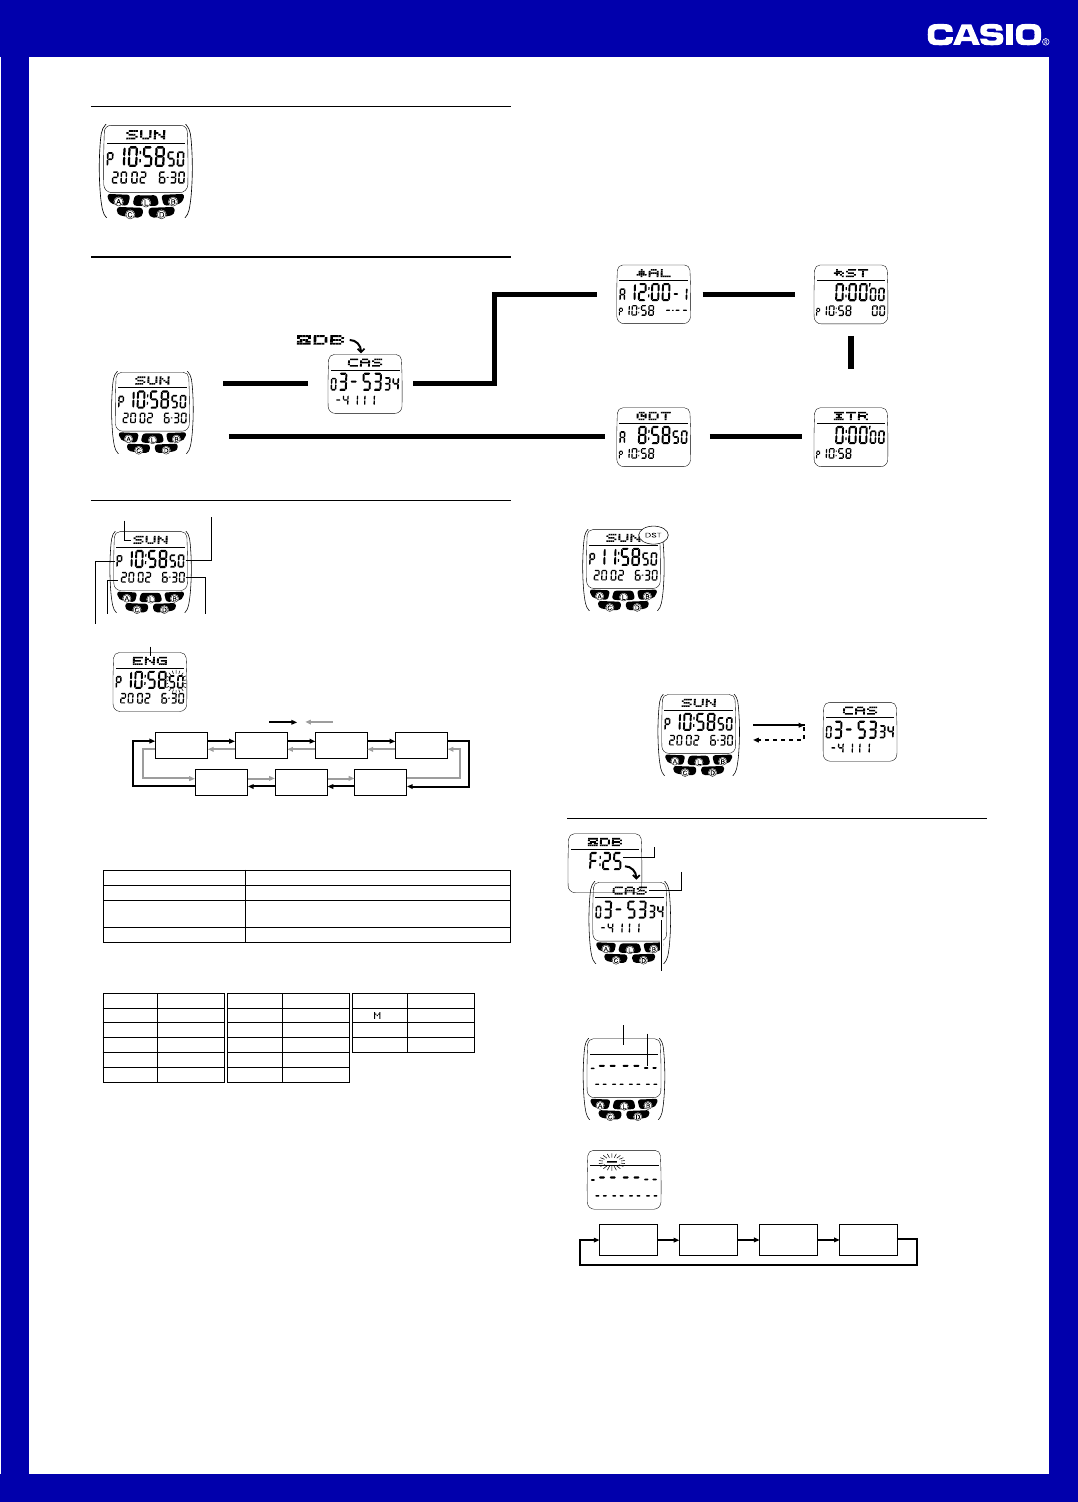
General Guide
• Press C to change from mode to mode.
• In any mode, press L to illuminate the display.
Stopwatch Mode
Timekeeping Mode
Alarm Mode
▲
▲
▲
▲
Press C.
▲
Data Bank Mode
▲
Countdown Timer Mode
Dual Time Mode
Timekeeping
Use the Timekeeping Mode to set the time and date. You
can also view the Data Bank Mode screen from the
Timekeeping Mode.
Note
This watch is capable of displaying text for the day of the
week in any one of 13 different languages (English,
Portuguese, Spanish, French, Dutch, Danish, German,
Italian, Swedish, Polish, Romanian, Turkish, and Russian).
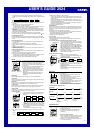
To set the time and date
1.In the Timekeeping Mode, hold down A until the
seconds start to flash, which indicates the setting
screen.
2.Use D and C to move the flashing in the sequence
shown below to select other settings.
Day of week
Hour : Minutes
Seconds
Year Month–Day
PM indicator
Language indicator
• The currently selected language indicator flashes on the display while the
Language (setting) is selected in the above sequence.
3. When the setting you want to change is flashing, use B to change it as described
below.
Seconds Year Month
Day
Minutes
Hour
Language
Press D. Press C.
To change this setting
Seconds
Year, Month, Day, Hour,
Minutes
Language
Perform this button operation
Press B to reset to 00.
Use B to increase the setting.
Use B to change the language setting.
• While the language indicator is flashing on the display, use B to cycle through
the language indicators as shown below, until the one for the language you want
to select is displayed.
4. Press A to exit the setting screen.
• The day of the week is automatically displayed in accordance with the date (year,
month, and day) settings.
• See the “Day of the Week List” for information on abbreviations used.
• In addition to the day of the week display, the language setting also affects the type
of characters you can input for the name in the Data Bank Mode.
• Holding down A in the Timekeeping Mode displays the indicator for the currently
selected language. Keeping A depressed for one or two seconds changes to the
Timekeeping Mode setting screen (indicated by the seconds flashing). If you
accidentally display the setting screen, press A again to exit.
Indicator Language
ENx English
POR Portuguese
ESP Spanish
FRA French
NED Dutch
Indicator Language
DAN Danish
DEU German
ITA Italian
SVE Swedish
POL Polish
Indicator Language
RO Romanian
T)R Turkish
PUC Russian
To toggle between 12-hour and 24-hour timekeeping
In the Timekeeping Mode, press D to toggle between 12-hour timekeeping (indicated
by A or P on the display), or 24-hour timekeeping.
• With the 12-hour format, the P (PM) indicator appears on the display for times in the
range of noon to 11:59 p.m. and the A (AM) indicator appears for times in the range
of midnight to 11:59 a.m.
• With the 24-hour format, times are displayed in the range of 0:00 to 23:59, without
any indicator.
• The 12-hour/24-hour timekeeping format you select in the Timekeeping Mode is
applied in all modes.
Daylight Saving Time (DST)
Daylight Saving Time (summer time) advances the time setting by one hour from
Standard Time. Remember that not all countries or even local areas use Daylight
Saving Time.
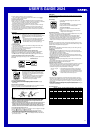
To toggle the Timekeeping Mode time between DST and Standard Time
Holding down D for about two seconds in the
Timekeeping Mode toggles between Daylight Saving Time
(DST display) and Standard Time (DST not displayed).
• Note that pressing D in the Timekeeping Mode also
toggles between 12-hour timekeeping and 24-hour
timekeeping.
• The DST indicator appears on the display to indicate
that daylight saving time is turned on.
To display the Data Bank screen in the Timekeeping Mode
Holding down B displays the record you were viewing when you last used the Data
Bank Mode.
Data Bank Screen
Hold down B.
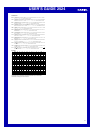
Data Bank
The Data Bank Mode lets you store up to 30 records,
each containing name and telephone number data.
Records are automatically sorted based on the characters
of the name. You can recall records by scrolling through
them on the display.
• The characters you can input for the name depend on
the language you select in the Timekeeping Mode. See
“To set the time and date” for more information.
Changing the language setting does not affect names
that are already stored.
• See “Sort Table” for details on how the watch sorts
records.
• All of the operations in this section are performed in the
Data Bank Mode, which you enter by pressing C.
Remaining
memory
Name
Telephone number
To create a new Data Bank record
1.In the Data Bank Mode, press D to display the new
data screen.
• If the new data screen does not appear when you
press D, it means that memory is full. To store
another record, you will first have to delete some of
the records stored in memory.
2.Hold down A until the flashing cursor (_) appears in
the name area of the display.
3.In the name area, use B to cycle through characters at
the cursor position. The characters cycle in the
sequence shown below.
Name area
Number area
New Data Screen
• The above character sequence is for English input. See “Character List” for the
character sequences of other languages.
4. When the character you want is at the cursor position, press D to move the cursor
to the right.
5. Repeat steps 3 and 4 until the name is complete.
• You can input up to eight characters for the name.
6. After you input the name, press D as many times as necessary to move the cursor
to the number area.
• When the cursor is located at the eighth space of the name area, moving the
cursor to the right causes it to jump to the first digit of the number. When the
cursor is at the 15th digit of the number, moving it to the right (by pressing D)
causes it to jump to the first character in the name.
• Pressing D moves the cursor the right, while C moves it to the left.
A
to
Z
(alphabet)
(space)
@
to
-
(symbol)
0
to
9
(number)
MO0707-EB