


2080-1
Module No.2080
GENERAL GUIDE
• If the digital display of your watch is continually changing, see “About Auto Display” for information on how to stop it.
• Press
CC
CC
C to change from mode to mode. After you perform an operation in Countdown Alarm Mode or Stopwatch Mode, pressing
CC
CC
C returns to the Timekeeping Mode.
• In the Timekeeping Mode, press
DD
DD
D to illuminate the display for about two seconds.
TIMEKEEPING MODE
The settings you make in the Timekeeping Mode are very important, because they
affect the Moon Data, Tide Graph, and Sunrise/Sunset functions.
There are three setting screens in the Timekeeping Mode: the Time and Date Setting
Screen, DST, GMT Differential, Point Name Setting Screen, and Longitude/Latitude,
Lunar Tide Interval Setting Screen.
• For normal timekeeping, you need to set the time, and date, and turn daylight
saving time (summer time) on or off.
• To use the Moon Data, Tide Graph, and Sunrise/Sunset functions, you must set the
GMT differential, your current longitude and latitude, and the lunar tide interval on
your point.
• If you do not operate any button for a few minutes while a selection is flashing, the
flashing stops and the watch goes back to the Timekeeping Mode automatically.
To set the time and date
• Use this screen to set the current time and date, to
reset the seconds to 00, and to toggle between 12-hour
and 24-hour timekeeping.
1.In the Timekeeping Mode, check if the DST indicator is
displayed, and change the DST setting in accordance
with the timekeeping in your area.
• Turn on DST if daylight saving time (summer time) is
currently in effect in your area. If daylight saving time is
not currently in effect in your area, be sure to turn DST
off.
• See “To turn DST on and off” for details about turning
DST on and off.
2.In the Timekeeping Mode, hold down
AA
AA
A until the
seconds digits start to flash. This is the Time and Date
Setting Screen.
3.Press
CC
CC
C to move the selection around the display in
the following sequence.
Seconds Hour
Minutes
12/24-Hour
Format
Day YearMonth
4.While the seconds digits are selected (flashing), press
DD
DD
D to reset the seconds to
00. If you press
DD
DD
D while the seconds count is in the range of 30 to 59, the seconds
are reset to 00 and 1 is added to the minutes. If the seconds count is in the range
of 00 to 29, the minutes count is unchanged.
5.While any other digits (besides seconds), are selected (flashing), press
DD
DD
D to in-
crease the number or
BB
BB
B to decrease it. Holding down either button changes the
current number at high speed.
• While the 12/24-hour setting is selected, press
DD
DD
D to switch between the two
formats.
• The day of the week is automatically set in accordance with the date.
• The date can be set with the range of January 1,1995 to December 31, 2039.
6.After you are finished making the settings you want, press
AA
AA
A to advance to the
DST, GMT Differential, Point Name Setting Screen. To return to the normal Time-
keeping Mode screen, press
AA
AA
A three times.
DST, GMT Differential, Point Name Setting Screen
Use this screen to switch DST (daylight saving time or
summer time) on and off, to specify the GMT differential
from your current location and to input new point names.
DST
ON/OFF
GMT
differential
1st
character
2nd
character
8th
character
Point name
To turn DST on and off
While ON or OFF and the small DST mark are flashing on the display, press
DD
DD
D to
toggle DST on and off.
Important!
• Be sure to use this procedure to turn daylight saving time (summer time) on and off.
Never manually change the timekeeping setting to adjust for daylight saving time.
Doing so will produce incorrect Moon Data, Tide Graph, and Sunrise/Sunset data.
Use
CC
CC
C to move the flashing to the GMT differential value.
To set the GMT differential
Notes
• The GMT differential is the difference in time between the time zone where you are
currently located and Greenwich Mean Time (GMT).
• See “TIME ZONE CHART” at the back of this manual for information about deter-
mining the GMT differential in your area.
1.Press
DD
DD
D to increase the value or
BB
BB
B to decrease it. Holding down either button
changes the setting at high speed.
2.Use
CC
CC
C to move the flashing to the first character of the point name.
To change a point name
1.Press
DD
DD
D to scroll forward through the characters at the current flashing location, or
BB
BB
B to scroll backwards. Holding down either button changes the current characters
at high speed.
2.When the character you want is displayed, press
CC
CC
C to advance to the next
character.
3.Repeat steps 1 and 2 for all eight characters of the point name.
• After you are finished making the settings you want, press
AA
AA
A to advance to the
Longitude/Latitude, Lunar Tide Interval Setting Screen.
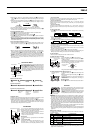
Longitude/Latitude, Lunar Tide Interval Setting Screen
Use this screen to specify the longitude, latitude, and
lunar tide interval of your current location.
Longitude/Latitude
Lunar tide interval
MinutesHour
To set the longitude and latitude of your current location
While the Longitude/Latitude is flashing on the display, use
DD
DD
D to change the
longitude value and
BB
BB
B to change the latitude value.
• After you are finished making the settings you want, press
CC
CC
C to advance to the
Lunar Tide Interval Setting Screen.
To set the lunar tide interval at your current location
1.Press
DD
DD
D to increase the hour value or
BB
BB
B to decrease it. Holding down either button
changes the setting at high speed.
2.Press
CC
CC
C to move to the minutes digits.
3.Press
DD
DD
D to increase the minutes value or
BB
BB
B to decrease it.
4.After you are finished making the settings you want, press
AA
AA
A to return to the
normal Timekeeping Mode Screen.
About the lunar tide interval
The lunar tide interval is the period from the moon’s upper transit (moon up) to high
tide. If you know the lunar tide interval, tide changes can be determined using the
moon age. This watch calculates tide changes according to the current time and the
location setting, and displays them graphically.
To calculate the lunar tide interval
1.Look up the high tide time for the flood tide of the location whose tide changes you
want to know.
2.Use this watch to look up the moon up time that occurs immediately before this
time.
3.
Subtracting the moon up time from the high tide time produces the lunar tide interval.
MULTI-TIME MODE
To view point data
1.In the Timekeeping Mode, press
BB
BB
B to enter the Multi-time Mode. The first point
that appears is the one you selected as your home time point.
2.Press
BB
BB
B to scroll through the data for the 10 points. The watch beeps and returns
to the Timekeeping Mode after the tenth point.
• Pressing
CC
CC
C at any time in the Multi-time Mode immediately returns to the Time-
keeping Mode.
• You can use the procedure under “DST, GMT Differential, Point Name Setting
Screen” and “Longitude/Latitude, Lunar Tide Interval Setting Screen” to change
the name and other data of a point.
This watch comes pre-programmed with data for 10 fishing points around the world.
The data for each point includes an 8-character point name, GMT differential, longi-
tude and latitude, and lunar tide interval. Setting the current time and date for any of
the points causes the time and date settings for all other points to be adjusted ac-
cordingly. In the case of DST, however, you must make a separate setting for each
point. You can use the following procedure to select any one of the ten points as your
home time point.
• See the “PRESET LOCATION CHART” at the back of this manual for details on
the locations whose data is preset in watch memory when you purchase it.
To select a point for your home time
• While the point you want to use for your home time is displayed in the Multi-time
Mode, hold down
DD
DD
D for about two seconds.
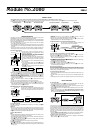
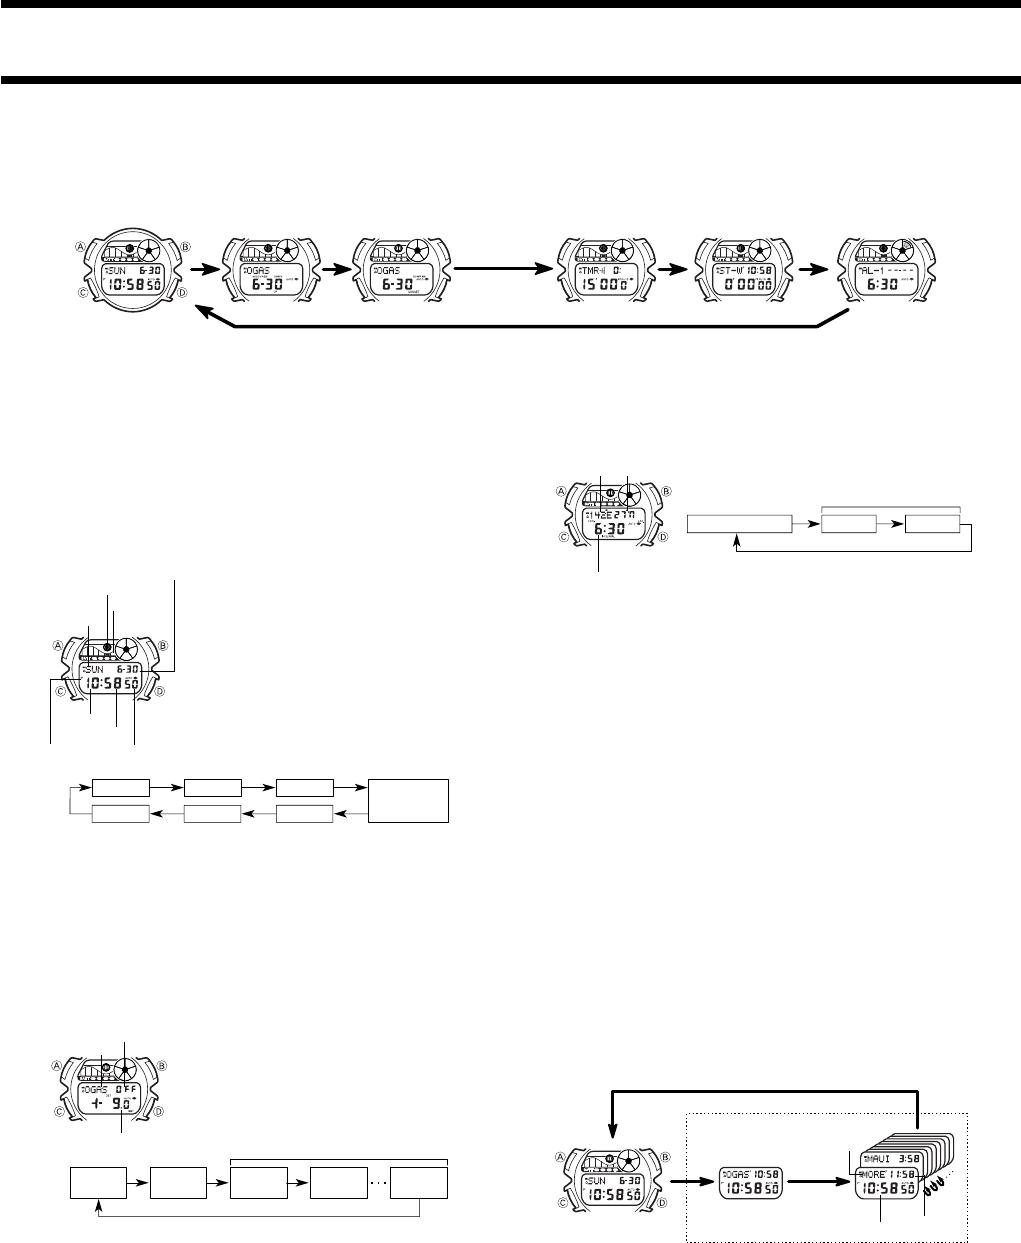
Timekeeping Mode
Moon Data Mode Sunrise/Sunset Mode Countdown Alarm Mode
Stopwatch Mode
Alarm Mode
Day of week
Tide graph
Moon graph
Month - Day
Seconds
Minutes
Hour
PM indicator
Point name
DST ON/OFF
GMT differential
Latitude
Longitude
Lunar tide interval
Multi-time Mode
Point name
Home time
Local time