


Bedside Weather
Radio
12-260
What’s Included
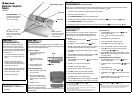
Mounting the Weather Radio
You can place your weather radio on a flat
surface, such as a desk, shelf, or table, or
mount it on the wall. To mount it on the wall,
you need two screws (not supplied) with heads
that fit into the keyhole slots on the bottom of
the weather radio.
1. Use a pencil to mark the mounting screw
locations 3
11
/
16
-inch (94mm) apart on the
wall.
2. Drill a hole at each marked location.
Thread a screw into each hole, making
sure each screw's head extends about ¼
inch (6.5mm) from the wall.
3. Align the keyhole slots on the bottom of the
weather radio with the screw heads, and
slide the radio down to secure it.
4. Extend the antenna upward.
Connecting Power
Your weather radio uses the supplied 6V, 300 mA AC adapter for power.
You can also install four AA batteries (not supplied) for backup power if AC
power fails or is temporarily disconnected.
AC Power Connection
1. Insert the adapter’s barrel plug
into the weather radio's
DC 6V jack.
2. Plug the other end of the
adapter into a standard AC
outlet.
3. Route the adapter's cord
through the strain relief.
Installing Backup Batteries
1. Slide off the battery compartment
cover to remove it.
2. Place four AA batteries in the
compartment as indicated by the
polarity symbols (+ and -) marked
inside.
3. Replace the cover.
The battery icon (
0
) shows battery
power. When all segments are lit, the
batteries have full power. The number of lit segments decrease as battery
power decreases.
DC 6V
Strain Relief
Step One
Step Three
• Weather Radio
•AC Adapter
Step Two
• Owner’s Manual
Using the Weather Radio for the First Time
When you turn on the weather radio the first time, all LCD segments light for a few seconds, and the automatic channel search
begins. When an active channel is found,
Ê
appears. If no channels are detected,
©
flashes.
1. Connect the weather radio to AC power and install the backup batteries.
2. Extend the weather radio’s antenna.
3. Press WEATHER/SNOOZE to listen to the weather broadcast.
4. Repeatedly press
e
or
d
to adjust the broadcast volume to the desired level. VOL and the volume level (1- 8) appear.
5. Press WEATHER/SNOOZE to turn off the broadcast.
6. Repeatedly press
e
or
d
to adjust the weather alert volume to the desired level. VOL and the volume level (1- 8) appear.
Step Four
Function Setup
Function setup allows you to select a channel, and set the alarm
and clock time. You can also enable or disable the signal loss
reminder so that an alert sounds when the radio signal is lost.
Set Channel
1. Hold down SET until you hear a beep. CH1-7(current channel
number) flashes.
2. Press SET to turn on the broadcast audio. NOAA appears.
3. Press
e
or
d
to manually change the channel. Or, hold down
e
or
d
to automatically search for the strongest channel.
4. Press SET to confirm the selected channel number. The alarm
time flashes.
5. Hold down SET to return to the normal display. Or, press SET
to set the alarm time (proceed to number 4 below).
Set the Alarm Time
1. Hold down SET until you hear a beep. CH1-7(current channel
number) flashes.
2. Press
e
once. The current alarm time flashes
3. Press SET. The alarm hour digits flash.
4. Press or hold down
e
or
d
to set the alarm hour.
5. Press SET to confirm. The alarm minute digits flash.
6. Press or hold down
e
or
d
to set the alarm minutes.
7. Press SET to confirm. The clock time flashes.
8. Hold down SET to return to the normal display. Or, press SET
to set the clock time (proceed to number 4 in the next section).
Set the Clock Time
1. Hold down SET until you hear a beep. CH1-7(current
channel number) flashes.
2. Press
e
twice. The current clock time flashes
3. Press SET. The clock hour digits flash.
4. Press or hold down
e
or
d
to set the hour.
5. Press SET to confirm. The minute digits flash.
6. Press or hold down
e
or
d
to set the clock minutes.
7. Press SET to confirm.
% and the current signal loss
reminder setting (On or OFF) appear.
8. Hold down SET to return to the normal display. Or, press
SET to enable or disable the signal loss reminder (proceed
to number 4 below).
Enable/Disable the Signal Loss Reminder
1. Hold down SET until you hear a beep. CH1-7(current
channel number) flashes.
2. Press
e
three times. The current setting (On or OFF) and %
appear.
3. Press SET. % flashes.
4. Press
e
or
d
to toggle between On and OFF.
5. Press SET to confirm. CH and the current channel number
flash.
6. Hold down SET to return to the normal display. Or, press
SET to return to channel setting mode.
SET —Hold for two
seconds to enter function
setup mode, or pressto
confirm selections.
e
and
d
— Press to adjust
the broadcast and alert
volume, or to set the channel
number, clock time, and alarm
time values.
WEATHER/SNOOZE — Press
to start and stop the weather
broadcast or to enable the
alarm or snooze feature.
Ô BATTERY NOTES Ô
• Dispose of old batteries promptly and properly.
• Do not burn or bury batteries.
• Use only fresh batteries of the required size and recommended type.
• Do not mix old and new batteries, different types of batteries, or rechargeable
batteries of different capacities.
• If you do not plan to use the weather radio for a month or more, remove the
batteries. Batteries leak chemicals that can damage electronic parts.
Ô NOTES Ô
•
PM appears for a PM hour in alarm and clock setting mode.
• The signal loss reminder beep does not sound when the NWS broadcast is on.
• The backlight is always on when operating with AC power. When operating on
battery power, the backlight turns on only when you press a button.
Alarm Time
Clock Time
Signal Strength Indicator