


WM-FX487° M-FX485 © WM-FX483-
WM-FX487
FX487
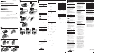
The instructions in this manual are for WM-FX487, WM-FX485 and WM-FX483.
Before you start reading, check your model number. WM-FX487 is the model
used for illustration purposes. Any differences in operation are clearly indicated
in the text, for example, “FX487 only”.
HOLD
œ
VOL
a
b
c
a
b
a
b
c
D
FX487
OPEN
TAPE
HOLD
VOL
SET
œ
MENU
œ
FF
p
REW
œ
FF
p
REW
SET
MENU
MODE aNR
SET
MENU
MODE aNR
SET
MENU
MODE
FX485/FX483
FX485/FX483
FX487 FX485 FX483
FX487
1
2
B
FX487
A
TAPE
HOLD
VOL
SET
œ
MENU
Walkman
B a
B b
C
1
2
2 L
R
z
D a
1
2 HOLD
HOLD
3 MENU ¡
TAPE ≥ SET
TYPE I
METAL CrO2 TYPE II
TYPE IV
4 ϡ
VOL
Walkman VOL
p°
OPEN
D b
œ
p
FF
REW
REW
FF
D c
MENU ¡
MODE ≥ SET ¡
a
Å
D c
MENU ¡
a NR°
SET ¡ N°
DOLBY D a
p
œ
REW
FF
µ
µ
”
A a
R6 AA
n
3
•
• 30
EIAJ*
24 7.5
38 14
EIAJ° lectronic Industries
Association of Japan
Sony HF
•
A b
A c
AC-E30HG
DC IN 3V
AC-E30HG
Radio Cassette Player
3-864-138-13(1)
Operating Instructions
2
2
FX487
FX485/FX483
C
WALKMAN Sony
WALKMAN is a registered trademark of Sony Corporation.
Sony Corporation © 1998 Printed in Malaysia
WM-FX487/FX485/FX483
English
µ
µ
To Press (see
Fig. D-b)
play the other side œ
(play)
during playback
stop playback p
fast forward FF
during stop
rewind REW
during stop
play the same side REW
from the beginning during
(Rewind Auto playback
Play function)
play the other side FF
from the beginning during
(Skip Reverse playback
function)
To select playback mode
(see Fig. D-c)
Press MENU repeatedly to set the
cursor to MODE in the display.
Then press SET to select the desired
mode.
To play Select
Both sides repeatedly a
Both sides once Å
from the side facing
the cassette holder
To play a tape recorded with
Dolby* NR system (FX487/
FX485 only) (see Fig. D-c)
Press MENU repeatedly to set the
cursor to a NR (Dolby noise
reduction) in the display. Then
press SET to show “ON”.
* Dolby noise reduction manufactured
under license from Dolby
Laboratories Licensing Corporation.
“DOLBY”and the double-D symbol
a are trademarks of Dolby
Laboratories Licensing Corporation.
To use the belt clip
With the supplied belt clip, you can
wear your Walkman on a belt for
convenient use.
To remove the belt clip
(see Fig. B-a)
To attach the belt clip
(see Fig. B-b)
Connecting the
Headphones/
Earphones
(see Fig. C)
1 Connect the headphones/
earphones to 2.
2 Wear the “L” marked side to
the left ear and the “R” marked
side to the right ear.
If the earphones do not fit to
your ears or the sound is
unbalalnced, turn round the
earphones a little to fit to your
ears firmly.
zOperating the
Walkman
Playing a Tape
(see Fig. D-a)
1 Open the cassette holder and
insert a cassette.
2 Make sure the HOLD function
is turned off.
If it is on, slide the HOLD
switch to turn it off.
3 Press MENU repeatedly to set
the cursor to TAPE in the
display.
Then press SET to select the
tape type.
No message: normal (TYPE I)
METAL: CrO2 (TYPE II) or
metal (TYPE IV)
4 Press œ (play) to start playing
then adjust the volume.
When adjusting the volume on
the Walkman (FX487 only)
Set the VOL control on the remote
control at maximum.
When adjusting the volume on
the remote control (FX487 only)
Set the VOL control on the Walkman
slightly above the appropriate level.
Note on the cassette holder
When opening the cassette holder,
press the p (stop) button and make
sure the tape is stopped by checking
through the cassette window, then
slide the OPEN switch.
If the cassette holder is opened before
the tape is stopped, the tape may
loosen and be damaged.
”Getting Started
Preparing a Power
Source
Dry Battery (see Fig. A-a)
Open the battery compartment lid,
and insert two R6 (size AA) dry
batteries with correct polarity.
When to replace the
batteries
Replace the batteries when “n”
flashes in the display.
The battery remainder mark has 3
steps to show the remaining battery
power.
Display Condition
The battery power is
full.
The battery power is
decreasing.
The batteries are
exhausted. Replace them
with new ones.
Note
• The battery remainder mark may
temporarily show a lower level
during fast forwarding or rewinding
or use in extremely low
temperatures.
• When replacing batteries, replace
both batteries within 30 seconds;
otherwise all the memories
including the preset radio stations
will be canceled.
Battery life
(Approx. hours) (EIAJ*)
Sony Sony
alkaline R6P
LR6 (SG) (SR)
Tape playback 24 7.5
Radio reception 38 14
* Measured value by the standard of
EIAJ (Electronic Industries
Association of Japan). (Using a Sony
HF series cassette tape)
Notes
• The battery life may shorten
depending on the operation of the
unit.
For maximum performance we
recommend that you use alkaline
batteries.
If the battery compartment lid
comes off
Attach it as shown (see Fig. A-b).
House Current (mains)
(see Fig. A-c)
Connect the AC power adaptor
AC-E30HG (not supplied) to the DC
IN 3V jack and to the mains. Do not
use any other AC power adaptor.
Specifications for AC-E30HG varies
for each area. Check your local
voltage and the shape of plug
before purchasing.
Polarity of
the plug
(turn over)