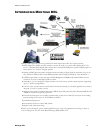
User’s Guide
INSTALLATION
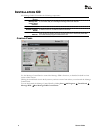
SYSTEM REQUIREMENTS
Before proceeding with the installation, please make sure that your system meets the following minimum
specifications for use with the Montego DDL:
Pentium 800 MHz / compatible or higher with one available PCI expansion slot
Approximately 100 MB free space is required during the driver / application
installation process. Additional space required for software applications
installation.
800x600 High Color (16-bit)
Windows® 2000 Professional, XP or Media Center Edition, Vista/Windows 7
Quad-Speed CD-ROM or DVD-ROM drive required for software installation.
A DVD drive, a compatible software DVD player application, and a high quality 5.1
Surround speaker system (five powered speakers plus a powered subwoofer) are
required for playing back Dolby® Digital (AC-3) audio from DVD movies with the
Montego DDL.
Montego DDL works with powered 2-speaker, 4-speaker, 5.1 and 7.1 speaker
setups, or with headphones.
The Dolby Digital Live output requires an external A/V receiver or digital speakers
with a Dolby Digital Decoder.
REPLACING A PRE-INSTALLED SOUND CARD OR AN AUDIO CHIP ON THE
MOTHERBOARD
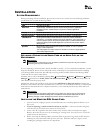
IMPORTANT!
Never remove or install cards from your PC while it’s powered on! Always turn off your PC before
proceeding with any work inside the case.
If you‘re replacing a sound card that‘s already installed in your PC, or if your motherboard includes a sound
chip, first disable the drivers for the old sound card or sound chip on your motherboard before installing
your Montego DDL sound card. This will help avoid any possible conflicts between the Montego DDL
sound card drivers and the older drivers.
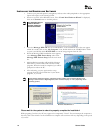
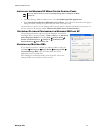
Generally, drivers can be disabled by clicking Start Control Panel System Hardware Device
Manager scroll down to Sound, Video and Game Controllers Right click on the device name
Click Disable from the pop-up menu.
Alternatively, drivers can typically be removed from the Add/Remove Programs option, located in the
Windows Control Panel, accessed as described above. However, you should consult the PC or motherboard
manufacturer's documentation for complete instructions, as the uninstall procedure may differ with each
manufacturer.
IMPORTANT!
Read the warranty information included with your PC before you open its case to remove the old
sound card and/or install the Montego DDL. Turtle Beach cannot be held responsible for loss of
warranty coverage or other damages incurred as a result of modifications to your PC.
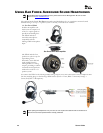
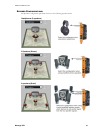
INSTALLING THE MONTEGO DDL SOUND CARD
1. Turn off your PC, unplug its power cord and disconnect any external peripherals. Remove your
PC‘s cover.
2. If you’re replacing a sound card that’s already in your PC… unscrew its bracket and gently
rock the card out of its PCI slot to remove it from your PC.
3. Locate a free PCI expansion slot that‘s furthest away from the video card and power supply.
Remove the metal slot rear cover by unscrewing its securing screw. Save the screw to secure the
sound card to the chassis later.
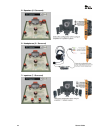
4. Before removing the Montego DDL sound card from its protective bag, touch the PC chassis to
discharge any static electricity build-up from your body. Hold the card by its edges to avoid
touching the gold edge connectors or components